When it comes to manicures, the shape of your nails can be just as important as the color you paint them. In fact, your nail shape creates the very canvas for your polish or nail art and can totally change the vibe of your hands. These days, nail shapes are more varied than ever, with influencers and celebrities sporting all kinds of silhouettes. From classic almond nails to trendy square nails, there are so many types of nail shapes to choose from. But which is the best nail shape for you? The answer depends on your personal style, finger shape, and lifestyle. Just like certain hairstyles flatter different face shapes, certain nail shapes can complement (and even slenderize) the shape of your fingers.
In this comprehensive guide, we’ll break down the most popular types of nail shapes – including round, square, squoval, oval, almond, stiletto, coffin (ballerina), and even the quirky lipstick shape. For each shape, you’ll learn the pros and cons, who it flatters most, how to file it, and even the best occasions or moods to rock it. We’ll also share some at-home shaping tips and product recommendations (with handy Amazon links) to help you achieve salon-worthy results. By the end, you’ll be ready to pick a nail shape that makes you feel confident and fabulous!
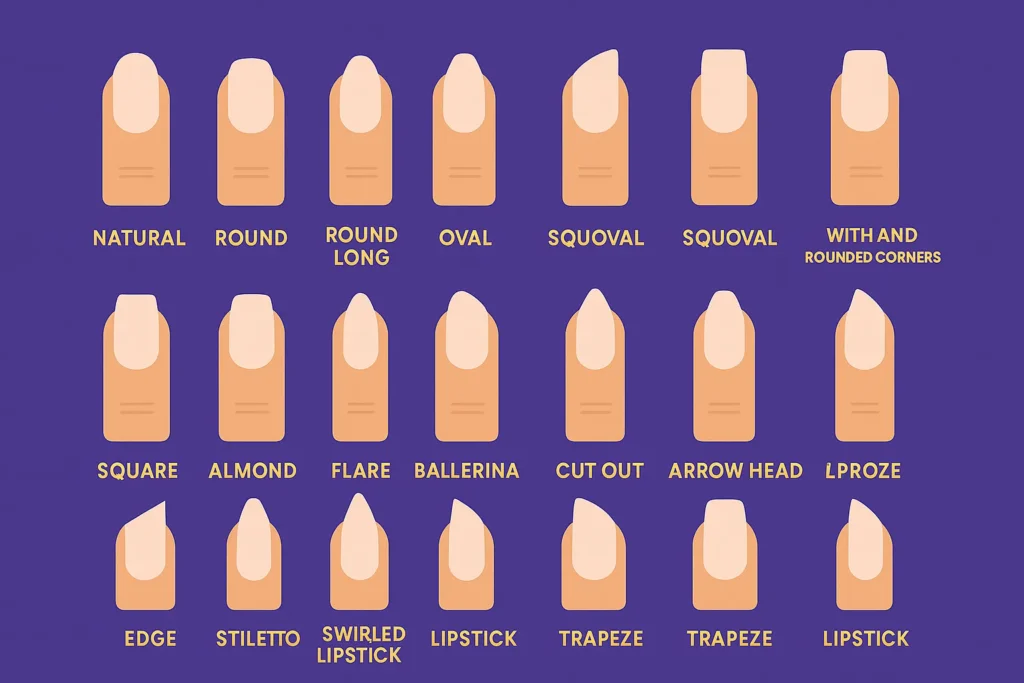
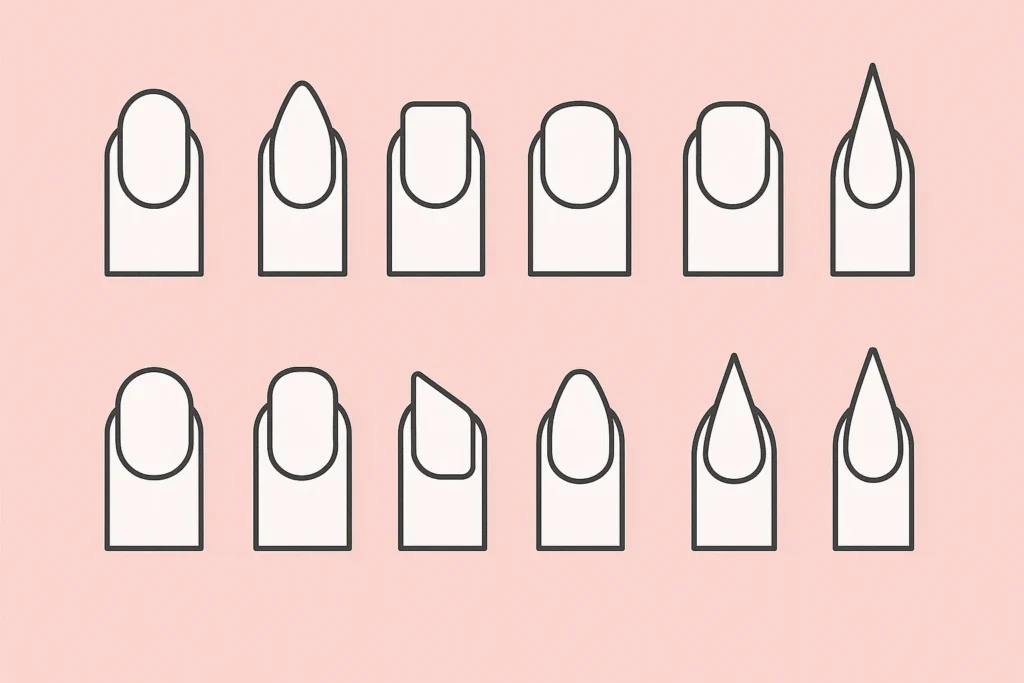
Above is a handy chart comparing various nail shapes side by side – from subtle round and oval shapes to bold stiletto and lipstick styles. Notice how each shape gives a different look to the finger. Keep this visual in mind as we dive into the details of each shape below.
Round Nails
Round nails are a timeless classic. They have a naturally curved shape that mirrors the contour of your fingertip. This simple shape is not only elegant but also very practical. Round nails tend to have smooth, blunt edges that are much less likely to snag on clothes or objects, making them ideal for an active lifestyle. They’re also one of the easiest shapes to maintain yourself at home – perfect if you’re low on time or new to filing.
Pros:
- Low-maintenance and easy to file at home (great for beginners).
- Smooth, rounded edges resist chipping and snagging on things.
- Can make wide nail beds or short fingers appear slimmer and longer.
Cons:
- Less surface area for nail art or French tips compared to squarer shapes.
- A very subtle look – not as instantly eye-catching or dramatic as edgier shapes.
- If nails are extremely short, the round shape can look more plain (though still neat).
Best For:
- Short natural nails or anyone who has trouble growing nails out long.
- People who use their hands a lot (the rounded shape won’t get in the way or break easily).
- A classic, professional look – great for everyday wear, offices, or if you prefer a minimalist style.
How to File: To create round nails, follow the natural curve of your fingertip when filing. Use a fine-grit nail file and file in one direction, rounding off any corners into a smooth semicircle. The result should be a soft, even curve at the tip of your nail.
Occasions: Round nails are incredibly versatile. They’re understated enough for professional settings and daily life, but you can dress them up with bold polish for special occasions. This shape is often the go-to for a low-fuss look or as a base for a classic solid-color manicure.
Square Nails
If you love a clean, modern look, square nails might be your best bet. Square nails feature straight side walls and a flat, horizontal free edge – basically a rectangle shape at the tip of each finger. This shape offers a chic, polished appearance that’s especially popular for classic French manicures. Square nails provide a nice, broad canvas for nail art or a bold pop of color. They’re easy to maintain with regular filing since you just keep the edges straight. Many people with naturally long fingers or narrow nail beds find square nails especially flattering, as the horizontal tip can balance out length.
Pros:
- Clean, classic look – perfect for French tips and solid colors alike.
- Straight edges give nails a sturdy appearance (and can feel stronger on acrylics or gels).
- Easy to shape: just file straight across to maintain.
- Looks great on medium to long nail lengths, providing a wide canvas for designs or ombré.
Cons:
- Sharp corners can be prone to snagging or breaking if not slightly rounded off.
- The square shape can make short fingers or wide nail beds appear shorter or stubbier.
- Not the most practical for very active lifestyles – a sharp corner can catch if you’re not careful (consider a “squoval” if this is an issue).
- On very short nails, a square shape might make the nails look even shorter.
Best For:
- Those who love a neat, professional manicure with a bit of edge.
- People with longer fingers or slimmer nail beds – the shape complements and flatters long fingers especially well.
- If you prefer a sturdy shape and don’t mind a little maintenance to keep those edges sharp. Square nails are also great if you want your nails to really stand out as a style element.
How to File: For a perfect square, file straight across the top of the nail to get a flat edge. Keep the file perpendicular to the nail to ensure the tip stays level. Once you have a straight edge, lightly file the corners just enough to remove any burrs (you can leave them sharp or slightly soften them, depending on preference). Be sure to file in one direction to avoid fraying the nail.
Occasions: Square nails have a sophisticated vibe. They’re fabulous for showcasing French manicures or geometric nail art. Wear square nails to complement a business-casual look or a night-out ensemble – they can read as either classy or edgy depending on the color and design. Many brides even choose a soft square (square with rounded corners) for a timeless wedding-day manicure.
Squoval Nails
Can’t decide between square and oval? Get the best of both worlds with squoval nails. The term “squoval” literally comes from square + oval – and that’s exactly what this shape is. Squoval nails have the flat top of a square nail, but with the corners gently rounded off into an oval-like curve. This creates a softer look than a strict square, without losing the chic, wide shape. Squoval nails are often touted as one of the most universally flattering shapes – they look great on most fingers and strike a perfect balance between edgy and practical. The rounded edges also mean you’ll have fewer snags or sharp corners, making this shape easy to live with for everyday tasks.
Pros:
- A versatile, balanced look – combines the elegance of oval with the trendy silhouette of square.
- No sharp corners to catch or break – the softened corners are more snag-proof than a true square.
- Flat tip still gives you a broad surface for nail art or French tips, but with a bit of curve for elegance.
- Low-maintenance: retains the strength of a square shape while requiring less frequent touch-ups on corners.
Cons:
- If done too round, it can lose the “square” appearance and just look oval – finding the right balance is key.
- Conversely, if the corners aren’t rounded enough, you might as well be square – so it requires a careful file job.
- Not as dramatically eye-catching as a sharp stiletto or coffin shape (squoval is more subtle).
- For very short nails, the squoval shape might be hard to distinguish from round.
Best For:
- Anyone who wants a classic shape with a modern twist. Squoval nails suit most hand shapes and sizes, so it’s a great default if you’re unsure.
- People who like the look of square nails but need a bit more durability – active folks who want to avoid corners chipping will appreciate squoval.
- Those with medium to long nails who can’t choose between oval or square – squoval gives a little of both and flatters a wide range of nail beds.
How to File: Start as if you were shaping a square nail: file straight across the tip to get a flat edge. Then, angle your file to the corners and round out just the sharp tips of each corner. Use a few gentle strokes to create a curved contour on each corner, blending it into the flat top. The end result should be a square-ish nail with smooth, tapered corners – a true “squoval.”
Occasions: Squoval nails are great for any occasion because they strike that middle ground. They’re polished enough for the office and durable enough for daily chores. At the same time, they can carry bold colors and nail art beautifully for special events. If you’re ever unsure which shape to choose for a big event, squoval is a fail-safe, universally flattering option that pairs with any style – from jeans and a tee to a cocktail dress.
Oval Nails
Elegant and feminine, oval nails are a step up from round nails when it comes to adding length and grace to your hands. The oval shape is like an elongated circle – imagine a round nail that’s been gently stretched upward. The tip is softly rounded, but more tapered than a basic round shape. This elongating effect can make your fingers look longer and more slender, which is why oval is often recommended for those with shorter or wider fingers. Oval nails maintain a smooth edge (no sharp points), so they’re still relatively low-risk for snagging. They also provide a nice surface area for creative designs, since the shape has both width and length. If you love a classic, sophisticated look with a touch of softness, oval nails could be your go-to.
Pros:
- Finger-elongating and slimming – the tapered oval tip creates an illusion of longer, slender fingers.
- Works well on both short and medium lengths (you get an elegant look even without extreme length).
- Smooth, rounded edges mean fewer snags and breaks compared to pointier shapes.
- Lots of versatility for nail art – the shape gives plenty of canvas without sharp tips that can be tricky to decorate.
- A universally flattering choice: oval nails suit almost any hand shape and are a staple of classic beauty.
Cons:
- If your nails are very short, you might need to grow a bit of free edge to achieve a noticeable oval shape.
- Not as edgy or dramatic as some modern shapes (oval is more traditional and sweet-looking).
- The tapered sides mean the nails can be a tad weaker than a full square – be mindful if you use your nails as tools (which you shouldn’t anyway!).
- Requires symmetry: you’ll need to file carefully to keep the oval shape even on both sides of the nail.
Best For:
- Wide nail beds or short fingers – oval nails help balance width and add an illusion of length.
- Those desiring a classy or natural look – oval is often seen as refined and is popular for business or formal settings.
- If you want something a bit more stylish than a simple round shape but still easy to maintain day-to-day.
- Nail art enthusiasts who want both elegance and space for creativity (florals, stripes, and subtle designs look great on ovals).
How to File: Start by marking your desired length and make sure each nail is roughly the same length. File the sides of the nail in a straight (or very slightly angled) line, similar to creating a square, but stop before you form a sharp corner. Then round off the edges in a gradual arch. Essentially, you’re filing the tip into a semicircle but with a more elongated axis (imagine an egg shape). File in one direction on each side toward the center of the tip. The result should be an even, symmetrical oval – narrower than a round shape, with no flat edge at the tip.
Occasions: Oval nails are a favorite for everything from everyday elegance to wedding manicures. They have a soft, approachable look. For instance, a sheer pink or nude on oval nails is the ultimate clean, put-together vibe (perfect for job interviews or professional settings). Yet oval nails can also be dressed up with glitter gradients or abstract art for parties and holidays. Because they’re so balanced, oval nails transition well from day to night. They’re a great choice when you want nails that can do it all.
Almond Nails
Almond nails are the darlings of the nail world when it comes to trendy yet wearable shapes. As the name suggests, this shape resembles an almond nut – slim on the sides and wider at the base, with a graceful rounded peak at the tip. Almond nails taper toward a rounded point, which instantly creates a lengthening effect on the hands. Many find this shape ultra-feminine and flattering. It’s a popular choice for fashion-forward individuals because it adds elegance and a bit of drama without being as extreme as a stiletto. Keep in mind, true almond nails usually require some length – your nails need to extend past your fingertips to achieve that pretty taper (often medium to long length is best for this shape). Whether done on natural nails (if they’re strong) or enhancements, almond nails are sure to turn heads with their chic silhouette.
Pros:
- Highly elongating – almond nails make your fingers look long and slender (hello, graceful hands!).
- Trendy and glamorous, yet still refined – it’s a staple on red carpets and Instagram feeds for a reason.
- The tapered tip is rounded, not super sharp, so they’re slightly more practical than stilettos (less likely to poke things).
- Great for nail art that follows the shape – e.g., ombré that fades toward the tip or designs that point upward will look amazing.
- Gives an instant “done” look – even with a simple solid color, almond nails appear stylish and intentional.
Cons:
- Requires longer nails or extensions – if your natural nails are short or tend to break, you might need gel/acrylic help to get an almond shape.
- The slim tip can still be delicate; there’s less nail width at the free edge, so nails might be more prone to splitting or breaking at the sides if they’re not strong.
- Regular upkeep needed: as your nails grow out, you’ll need to maintain that tapered shape with careful filing.
- Not the best for very hands-on activities or heavy typing – long almond nails can slow you down until you adjust to them.
Best For:
- Those who love a stylish, fashion-forward look but still want something wearable day-to-day. Almond is a favorite for its blend of practicality and glamour.
- People with thicker or wider nail beds who want a slimming effect – the almond shape can make the nails and fingers appear more narrow and long.
- Anyone prepared to maintain a bit of length and perhaps invest in strengthening treatments (almond beauties are worth the care!).
- Special occasions – if you want to feel a little extra and elegant (think weddings, parties, or anytime you want to channel your inner diva).
How to File: To create almond nails, first grow your nails out to at least a medium length (or use extensions). Begin by filing the sides at a slight angle, moving toward the center of the nail tip. The goal is to taper the sides so the tip will form a rounded point. As you file, periodically check that the taper is even on both sides. The tip of an almond nail should end in a softly rounded point – more pointed than an oval, but not as sharp as a stiletto. Finish by rounding off the very tip just a tiny bit, so it’s not razor-sharp. Patience is key; file a little on each side, alternate, and keep the shape symmetrical.
Occasions: Almond nails are fabulous for both everyday wear and glam moments. With a neutral or soft shade, they exude sophistication in the office or on a casual day out. With glitter or nail jewels, they become full-on glam for events. Because of their elegance, almond nails are popular for proms, weddings (for both brides and guests!), and any time you want to feel ultra-feminine and put-together. If you’re the type who loves compliments on your nails, almond is a shape that usually gets noticed and admired.
Stiletto Nails
Ready to make a bold statement? Stiletto nails are the ultimate show-stoppers. This shape is long, fierce, and ends in a dramatically sharp point – much like the stiletto heel of a shoe. Stiletto nails are all about confidence and edge. They instantly elongate your hands and fingers, creating a supermodel-like slendness. Many celebrities and nail art enthusiasts gravitate to stilettos when they want a high-impact look. With their dagger-like tips, stiletto nails provide a striking canvas for elaborate nail art, bling (think rhinestones), and creative designs. However, keep in mind that such a long, pointed shape is not the most practical for everyday life – typing, texting, or even picking up small objects can be challenging until you get used to them. Stilettos often require enhancements (acrylics or gels) because natural nails usually aren’t strong enough to hold this shape on their own. If you’re up for the drama and willing to take care, stiletto nails can be incredibly fun.
Pros:
- Head-turning drama: Stilettos are arguably the most eye-catching nail shape – expect lots of compliments and questions about your nails!
- Makes your fingers look ultra-long and slender – a great confidence booster if you love the look of long nails.
- Tons of room for nail art, especially 3D designs, gems, and glitter. The length lets you create miniature masterpieces on each nail.
- The pointed tip gives a very edgy, fashion-forward vibe. Even a simple color in this shape looks avant-garde.
- Perfect for special events, costumes, or whenever you want to feel like a rockstar.
Cons:
- Let’s be real: not the most practical shape for daily life. Tasks like buttoning a shirt, using a smartphone, or inserting contact lenses require extra care (and you might develop some clever workarounds).
- High maintenance – you’ll likely need acrylic or gel to achieve and maintain this length/shape, since natural nails can easily break in this style.
- If a stiletto nail breaks, it tends to be pretty catastrophic (due to the pressure on that point). Regular fills and strengtheners are a must.
- Sharp tips can be hazardous – you have to be careful not to scratch yourself or others. (They can literally double as letter openers, but we don’t recommend that use!)
- Generally not office-friendly in conservative workplaces – these nails make a statement that might not suit every environment.
Best For:
- Nail art lovers and trendsetters. If you view nails as part of your personal expression and don’t mind adapting your lifestyle a bit, stilettos are for you.
- Those with a bit of patience and willingness to maintain them (regular salon visits or fills at home).
- People with shorter or thicker fingers who want the illusion of length – stilettos will definitely lengthen the look of your hands (albeit with the trade-offs mentioned).
- Special occasions or short-term wear. Some people love to put on stiletto press-ons for a weekend party or event, then go back to a shorter shape for workdays. That’s a valid approach if you crave the look occasionally!
How to File: Achieving a stiletto shape usually starts with significant length. If using natural nails, they must be grown out quite long (and be very strong). Otherwise, most stilettos are sculpted with acrylics or gel tips. To file into a stiletto, mark the center of the nail tip as your peak point. Then file the sides at a sharp angle toward that point. You’re essentially creating a triangle at the free edge of your nail. File in smooth, long strokes from the side toward the tip on each side, keeping the point centered. Check alignment by looking at the nail head-on. The final point should be fine and sharp. (If you prefer a slightly less dangerous version, you can file the tip ever so slightly flat to create a tiny “needle” point rather than a pinpoint.) Remember: stiletto shaping is best done by professionals or with extreme care, as it’s easy to over-file – and once it’s too narrow or off-center, you might have to switch to coffin shape or start over.
Occasions: Stiletto nails are made for showing off. They’re fantastic for photoshoots, performances, parties, or whenever you want all eyes on your hands. Many people rock stilettos as their signature style, but if that’s not you, consider them for short-term fun – like vacations or holidays when you’re not doing a lot of manual work. Picture tapping those fierce nails around a cocktail glass on a girls’ night out, or complementing a flashy outfit at a concert – that’s stiletto territory. They’re less ideal for, say, a week of camping or moving house! Adjust your nail shape to your plans, and you can enjoy stilettos when the time is right.
Coffin (Ballerina) Nails
Coffin nails, also known by the more elegant name ballerina nails, have surged in popularity thanks to celebrities and beauty influencers. This shape combines the best of two worlds: the length and tapered sides of a stiletto, with a straight, squared-off tip instead of a point. The result? A nail that looks kind of like a coffin (hence the name) or, if you prefer, like a ballerina’s pointe shoe. Coffin/ballerina nails are trendy and edgy, yet slightly more wearable than ultra-sharp stilettos. They still require length (this shape really shines on long nails), but the flat tip provides a bit of stability and a large surface for color. You’ll often see coffin nails decked out in elaborate designs – they’re a favorite for ombré fades, glitter gradients, and those “Kylie Jenner” style monochrome sets. If you’re after a modern, fashion-forward manicure, coffin nails might be your match.
Pros:
- Stylish and on-trend – this shape is a staple of many Instagram nail pics and has a high-fashion feel.
- The flat tip means you won’t poke like with stilettos, and it offers a big area for creative nail art or French tips.
- Slightly more secure than a stiletto point – the squared end is less prone to accidental breakage than a super fine tip (though coffins can still break at the corners).
- Visually, it’s very elongating and flattering, adding length to the hand (similar to stiletto, but with a different flair).
- Versatile with designs: from matte solid colors that look ultra-chic in this shape, to bedazzled accent nails, coffin nails carry it all well.
Cons:
- Needs length and possibly enhancements: coffin nails usually require medium to long nails. Many people use acrylics/gel to get this shape if their natural nails don’t cooperate.
- The squared tip can put pressure on the nails; if you hit the tip straight-on, it might cause the nail to crack across (so treat them gently).
- Still not a “practical” shape for intensive manual tasks – while not as pointy as stilettos, they are long and tapered, which can get in the way if you’re not used to them.
- Corners can be a little sharp if not filed slightly – and those corners are potential weak spots if you tend to use your nails to open things (try not to!).
- Some workplaces might consider very long coffin nails too flashy – keep length moderate if you need a more professional appearance.
Best For:
- Fashionistas and trend enthusiasts – if you love keeping up with nail trends, you’ll enjoy rocking coffin/ballerina nails.
- People who want the drama of length but a flatter tip for practicality and style. It’s a nice compromise between stiletto and square.
- Those with sturdy nails or who are open to using nail enhancements. The look is fabulous, but natural nails must be quite strong (or enhanced) to hold this shape without frequent breaks.
- Anyone who wants a bold look that’s still a bit refined. Coffin nails can actually look quite sophisticated, especially in neutral or soft shades, while still showcasing your fashion-forward side.
How to File: To create coffin/ballerina nails, you’ll need length to start with. Begin by shaping the sides: file the sides in a taper (angle inwards) similar to how you’d start a stiletto shape. However, stop short of creating a point. Instead of bringing the sides to a point, leave a flat tip at the end. Once the sides are tapered to your liking, hold the file perpendicular to the nail and file straight across the tip to flatten it out. The width of that flat tip is up to you – true coffins often have a narrow tip, maybe 50-60% of the nail bed width. Ballerina nails might leave it a tad wider for stability. Finally, refine the corners: they should be squared, but you can slightly round just the very edges to prevent catching. The silhouette should resemble a coffin shape (narrower at the tip, squared off). Tip: If you accidentally take the sides in too much and the tip becomes very skinny, you might end up closer to an “edge” or stiletto shape – so file gradually and check the shape as you go.
Occasions: Coffin/ballerina nails are incredibly popular for all sorts of occasions. Many wear them as an everyday signature shape (especially if you love long nails). They can be dressed up or down: nude coffin nails with a subtle shimmer work for professional or formal events, while a set of long coffin nails with neon polish or crystal designs screams nightlife and fun. This shape is often seen on celebrities at events, in music videos, and on influencers in every setting. Whether you’re heading to a festival, a fancy dinner, or just want to feel glam running errands, coffin nails make a statement. Just be ready for people to ask, “How do you do anything with those nails?” – pro tip: the answer is usually “I make it work, and I love them!”
(Note: “Coffin” and “ballerina” generally refer to the same shape. Some nail techs use “ballerina” to describe a slightly softer version (with more gently rounded edges at the flat tip), whereas “coffin” might imply a sharply defined tip. But many people use them interchangeably. When in doubt, bring a photo to your nail tech to show exactly what you mean!)
Lipstick Nails
If you’re looking for a nail shape that’s quirky, trendy, and totally different – let’s talk lipstick nails! This avant-garde shape is inspired by a fresh tube of lipstick. Imagine the slanted angle of a brand-new lipstick bullet – one side higher, one side lower. That’s exactly what lipstick nails emulate: the nail is filed at a diagonal across the tip, creating a sloped flat edge. One corner of the nail will be higher than the other, just like a lipstick. The shape is usually kept square on the sides and then angled at the top. Lipstick nails are playful and have been popularized by nail artists who want to try something beyond the usual shapes. They can be done on natural nails if you have decent length, but often you’ll see them on extensions to really accentuate the angle. This shape definitely stands out and says you’re not afraid to experiment!
Pros:
- Uniquely eye-catching – not everyone at the office will have this shape, so you’ll get lots of curiosity and compliments. Great for standing out from the crowd.
- Flat, angled tip means you actually have a little more practicality than a pointed nail (you’ve got a blunt end, albeit slanted).
- Provides an interesting canvas for nail art – for example, a diagonal color block or design that follows the angle can look super cool.
- You still get a bit of length and taper (since one side is longer), but without a sharp point. It’s an in-between of square and stiletto in some ways (square sides but a skewed top).
- Shows that you’re on top of trends – lipstick nails have become a popular request for fashion-forward clients.
Cons:
- The asymmetrical shape can be prone to uneven wear – one side of the nail is longer, which could be more vulnerable if you hit it against something.
- It’s a less natural look; some people might find it odd (but hey, if you love it, that’s what counts!).
- Can be challenging to DIY – getting that angle just right on each nail so they match each other takes careful measuring and filing.
- Like other long shapes, if you use extensions, there’s upkeep involved, and if a corner breaks, the shape will be compromised.
- Not as universally flattering – lipstick nails are more about the style statement than hand-flattery. If you have very short nails or very wide nails, this shape might be tricky to execute nicely without a tech’s help.
Best For:
- Trendsetters and creative souls who get bored with the usual shapes. If you’ve tried coffin, almond, etc., and want something new – lipstick is a fun one to explore.
- People with fairly long nails (or those willing to get gel/acrylic extensions) – you need some length to showcase that angle properly.
- Those who don’t mind answering “Whoa, what shape are your nails?!” frequently. Be prepared to explain the lipstick inspiration!
- Nail art lovers – especially if you want to do designs that play with geometry. A glitter stripe following the slant, for instance, can emphasize the shape brilliantly.
- Generally, anyone who wants a trendy nail shape and can keep up with maintenance appointments (lipstick nails look best when sharply shaped, so you’ll reshape as they grow).
How to File: To achieve lipstick nails, start with a square or squoval nail of your desired length. Then choose the direction of the slant for each hand (usually, the high point is on the thumb side of each nail). File the top of the nail at a diagonalstyleseat.com – from one upper corner down to the opposite lower corner. For example, on one hand you might file from the top left of the nail down toward the right, creating a high left corner and low right corner. Do the opposite slant on the other hand for symmetry when you put your hands together (many prefer mirror angles on each hand). Keep the sides straight (don’t taper in; the sides remain vertical like a square nail). The result is a slanted tip that’s higher on one side. It helps to mark where you want the lowest point to be beforehand, so each nail ends up with a similar angle. Use a good file and go slowly – you want a crisp, even slope. Once done, lightly buff the edges so they aren’t razor sharp, and voila: lipstick nails!
Occasions: Lipstick nails are definitely a conversation piece, so wear them when you feel like embracing your bold, creative side. They’re fantastic for events like fashion shows, parties, or festivals where edgy beauty looks are celebrated. Even day-to-day, if you work in a creative field or simply love having fun with your style, lipstick nails can become your signature. They pair well with artistic nail designs and bright colors. Picture a hot pink or red on a lipstick-shaped nail – it literally looks like a lipstick, which can be a fun nod to the inspiration. Because they’re unusual, lipstick nails exude confidence. If you’re a beauty enthusiast who isn’t afraid to take risks, this shape lets everyone know it.
At-Home Nail Shaping Tips & Care Essentials
Experimenting with different nail shapes is exciting, and you can absolutely do it at home with a little practice! Here are some pro tips and tricks for shaping your nails and keeping them healthy:
- Use the Right Tools: Invest in a good-quality nail file (or a set of files). A glass nail file is a fantastic option because it’s gentle on nails and lasts a long time – for example, the highly-rated Mont Bleu Crystal Nail File set is a great choice for a durable file that won’t shred your nails.) For a complete kit, consider a Keiby Citom Essentials Kit that includes clippers, a file, and a buffer – having the right tools on hand makes shaping so much easier! Always use a fine-grit file (180 grit or higher) for natural nails to get a smooth finish.
- File Gently and One Way: When shaping, resist the urge to “saw” the file back and forth. Instead, use gentle strokes in one direction. Filing in one direction (from the side toward the center of the nail) helps prevent splitting and peeling. Take your time – shaping is a process. It’s better to file a little and check, rather than over-file and end up with uneven lengths or shapes.
- Mind Your Angles: For each shape, keep an eye on your filing angle. For example, hold your file at a 90° angle to get a straight square edge, or tilt it to around 45° for tapered shapes like almond or coffin. Small changes in angle can dramatically change the outcome. If needed, draw a tiny dot at the center of your nail tip as a guide (especially useful for stiletto or almond, to make sure your point is centered).
- Support the Nail: If your nails are longer, avoid putting too much pressure on the free edge while filing (it can flex and weaken the nail). Instead, you can hold your finger so that the nail is supported, or even file from underneath for certain angles. Also, never file after a shower or bath – nails are softer when wet and can tear more easily. File when nails are dry and at their strongest.
- Strengthen and Protect: Shaping into longer styles (like almond, stiletto, or coffin) means your nails need to be strong. Use a nail strengthener or hardener regularly to fortify those tips. A popular choice is OPI Nail Envy, a strengthening treatment that can help protect against chipping and splitting. Keeping your nails strong will help them hold shape and length without breaking.
- Hydration is Key: Don’t forget nail care doesn’t stop at shape. Well-moisturized nails and cuticles are more flexible and less likely to crack. Apply cuticle oil daily – it really makes a difference! A nourishing oil like Sally Hansen Vitamin E Cuticle Oil will keep your nail bed hydrated and can even improve growth. Massage a drop into each nail and cuticle before bed for healthier nails over time.
- Buff Carefully for a Finishing Touch: After filing, you can lightly buff the edges of your nails to smooth any roughness. A multi-step buffer (often included in kits) can also polish the surface of your nails to a healthy shine. Just don’t over-buff (no more than once a week) as it can thin your nails. A smooth edge and surface help reduce snags and give a clean look, especially for shapes like round or oval where a seamless curve is the goal.
- Know When to Trim: If you’re transitioning from one shape to another (say, square to oval), you might need to trim or clip a bit of length off the corners first. For example, to go from square to oval, clipping off the sharp corners at 45° angles before filing can save you time and make it easier to achieve the perfect oval without excess filing. Use a good quality nail clipper and clip a little at a time to avoid splits.
- Practice with Press-Ons: Not ready to commit your natural nails to a dramatic shape? Try press-on nails in various shapes! They come in coffin, stiletto, almond – you name it. You can file press-ons too, to refine the shape or length. It’s a no-commitment way to test drive a new nail shape and see how it feels in your daily life.
- Be Patient and Adjust: If you’re new to shaping, don’t worry if your first attempt isn’t salon-perfect. Shape your nails a little, wear it for a day, and see how you like it. You can always adjust the shape or shorten them if needed. Also, pay attention to how a shape affects your activities – for instance, if you love the look of stilettos but find you can’t type, you might opt for coffin or almond as a compromise next time. It’s all about finding what makes you comfortable and happy.
By following these tips and taking good care of your nails, you’ll find it easier to maintain any shape you choose. Healthy nails are the foundation of a great manicure, so a little TLC goes a long way.
Time to Nail Your Signature Shape!
Nail shapes might seem like a small detail, but as we’ve seen, they can completely change the look and feel of your hands. The types of nail shapes out there offer something for everyone – whether you prefer the classic simplicity of round nails or the bold flair of stiletto nails. The best nail shape for you is ultimately the one that makes you feel confident and fits your lifestyle. Don’t be afraid to experiment: you might be a square-nailed professional during the week and a coffin-nailed glamour queen on the weekend!
Remember, you can start with a universally flattering shape like squoval or oval if you’re unsure, and then venture into edgier territory when you’re feeling adventurous. With the tips and product recommendations above, you have everything you need for an at-home shape-over. So next time you’re due for a manicure, why not try a new shape?
Your nails are a fun extension of your personality – shape them to match how you feel! If you’ve always stuck to one style, mix it up and see how a different shape can give you a fresh vibe. And most importantly, enjoy the process. Pour yourself a mug of tea, put on your favorite music, and have a little DIY nail spa session.
Now it’s your turn: which nail shape will you try next? We’d love to know your favorites. Feel free to share your go-to nail shape or a shape you’re excited to experiment with. Embrace the creativity and let your nails do the talking! Here’s to nailing your style – one shape at a time.