Channel your inner fashionista with nostalgic nail art designs that bring bold vintage patterns to your manicure.
If you’re hunting for Fun Nail Ideas that blend old-school charm with modern style, look no further. These nine retro-inspired nail designs borrow motifs from iconic wallpaper prints, from 70s psychedelia to mid-century modern starbursts. Each one is bold, elegant, and completely achievable at home.
You’ll see how to get groovy wave swirls, delicate starbursts, damask overlays, and more with step-by-step guidance. Whether you’re matching the latest fashion trends or adding a pop of personality to your everyday look, these nail designs tie right in with retro fashion and interior trends. Ready to give your nails some vintage flair? Grab your polishes and brushes – let’s dive into these Fun Nail Ideas and make your manicure a showstopper!
70s Swirl Grooves – Bold Wave Patterns in Saturated Hues

The first Fun Nail Idea channels the free-spirited 1970s with groovy swirl designs. Think bold, wavy squiggles in rich, saturated colors – just like the psychedelic wallpaper and textiles of the 70s. (Back then, nails were all about “psychedelic shapes, colourful waves and flower power,” often pairing earthy browns and terracottas with bright pops of primary colors.) Swirl nails use curvy, overlapping waves painted on each nail to create a retro, nostalgic vibe. The look is playful and dynamic, perfect for making a statement.
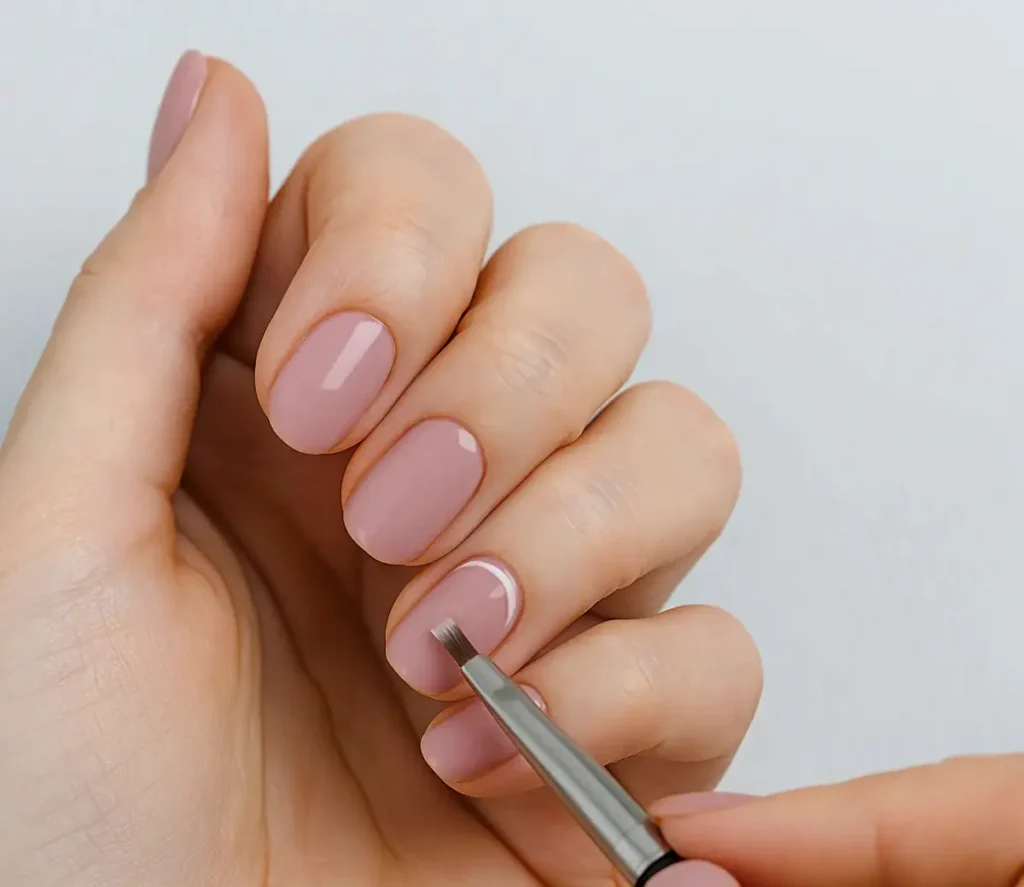
How to achieve this look:
- Prep your nails. Apply a clear base coat to protect nails and help polish adhere.
- Choose a base color. You can start with a neutral like white or light beige, or go all-in with a bright hue (yellow or orange suggest a sunny California vibe). Let it dry fully.
- Pick your swirl colors. Select 2–4 vivid shades (hot pink, turquoise, orange, chartreuse – go wild with the rainbow!). Vintage swirl art loved bright pastels and primaries, so don’t be afraid of bold combos.
- Draw the swirls. Using a fine nail-art brush (or a toothpick/dotting tool for thicker lines), paint freehand wave-like lines across each nail. The waves can loop from one side of the nail to the other or sweep down from the cuticle. They don’t have to be uniform – in fact, the less uniform, the more retro-chic. Layer colors: start with one wave in your first color, then add the next color wave next to it, and so on. You can overlap slightly so the colors meet in the middle of the nail, like a rainbow of curves. There’s no wrong way here!
- Accent if you like. For extra fun, add a tiny decal or sticker in a contrasting color (like a foil star or tiny smiley) atop one of the swirls – a nod to cute 70s motifs.
- Seal and shine. Finish with a glossy top coat to smooth the design and make those colors pop.
This 70s Swirl Groove mani is all about celebrating color and movement. The key is confidence and creativity: “add your waves at random across your nail and build your design with each color” for that authentic 70s feel. Once you try it, you’ll see how these swirls instantly give your mani a playful, retro energy.
Atomic Starbursts – Nude Base with Minimalist Starbursts

Next up, we’re jumping back to the 1950s/60s Atomic Age. For this Fun Nail Idea, picture mid-century modern star motifs – simple, spaced-out starbursts on a neutral backdrop. These designs recall vintage wallpaper and home decor that were “inspired by nuclear science” and featured starburst shapes everywhere. On nails, they translate to sharp, spiky stars (like little sunbursts) and dots scattered on a nude or pale pink base. The look is minimalist but oh-so-chic, channeling that optimistic Space Age vibe.
How to achieve this look:
- Apply a nude base color. Choose a natural pink-beige or milky nude polish and paint all nails. Allow it to dry thoroughly – this soft background makes the black starbursts stand out.
- Gather your tools. You’ll need a very fine nail art brush or a dotting tool/striping tool for precision, plus jet-black polish or acrylic paint.
- Create the starbursts. On each nail, draw small star shapes. To do this, paint a tiny cluster of radiating lines from one central point (like spokes on a wheel). Vary the size: maybe one 6-point star on one nail, two 4-point stars on another. Keep them asymmetrical for a modern look. (Tip: a toothpick dipped in black polish can make very fine lines.)
- Add dots. Randomly place little black dots around the stars (some bigger, some tiny) to mimic starry space. The negative space between shapes keeps the overall design clean and minimalist – a classic Atomic look.
- Top coat. Seal everything with a clear top coat to protect your art and give your nails a smooth, salon-like finish.
This Atomic Starbursts mani is surprisingly quick once you get the hang of drawing stars. The contrast of the stark black shapes on nude nails makes each little star pop, yet the whole vibe is elegant and subtle. Remember, these starbursts were an “atomic-era favorite” in wallpaper and decor, so you’re really paying homage to that vintage style. Keep the look clean and precise (a steady hand or a stamping plate could help if freehand is tricky). You’ll end up with a mid-century modern manicure that feels futuristic and refined.
Damask Drama – Burgundy Tips with Black Damask Overlays
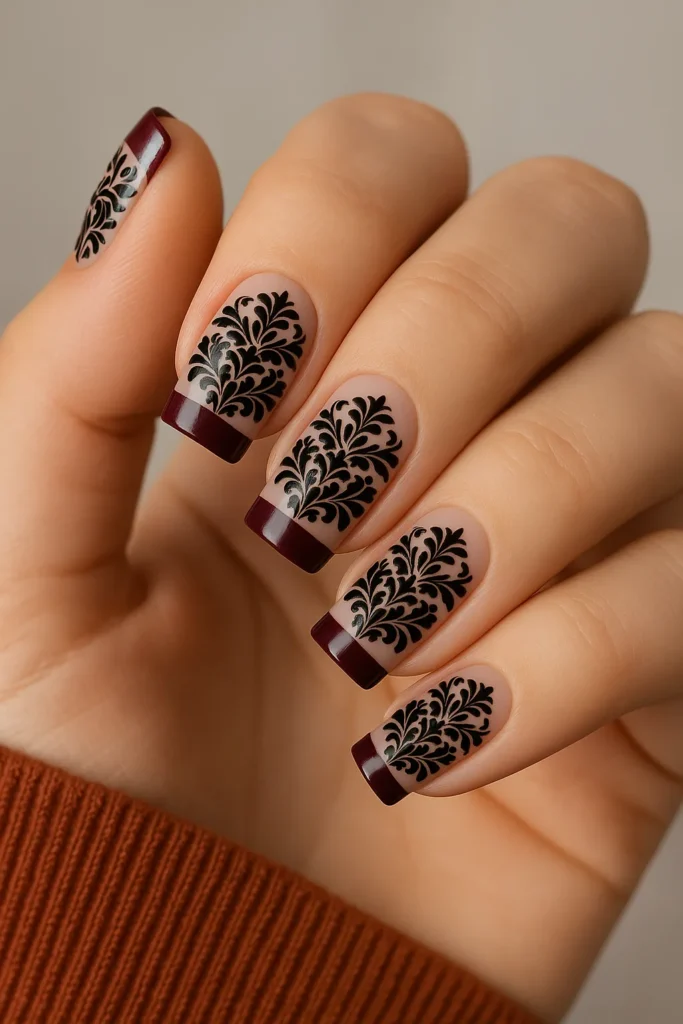
For a richer, more dramatic retro feel, try Damask Drama. Damask is a classic wallpaper and fabric pattern that’s ornate and romantic. It’s made of complex, symmetrical medallions that overlap in an elegant way. On nails, we’ll channel a regal vibe: deep burgundy tips contrasted by intricate black damask motifs on a light base. The color combination is a winner – burgundy is a “power color… sophisticated” with a luxurious feel, and black is the perfect neutral “companion” that adds drama. Together they scream chic sophistication.
How to achieve this look:
- Prep and base coat. Start with a matte or satin top coat on all nails for a subdued finish (a matte effect makes patterns look very on-trend). Then paint nails in a soft, pale pink or nude base. This lets the burgundy tips and black design pop.
- Paint burgundy tips. Using burgundy polish, do a modern French tip: either freehand a curved burgundy tip on each nail, or use sticker guides to paint a clean half-moon of color at the tip. Make sure the burgundy is opaque and even. Let it dry completely.
- Add the damask pattern. You can freehand a damask look with a super-fine brush (and black polish), but because damask is so detailed, using a stamping plate or water-slide decal might be easier for beginners. If doing it by hand, focus on painting tiny black fleur-de-lis shapes or scroll motifs where the burgundy meets the nude. Alternatively, stamp a repeating damask pattern over the nude area so that each nail has a bit of lace-like black design extending from the tip.
- Dot or accent. For even more flair, drop a tiny crystal or gold stud at the center of the largest damask motif on one accent nail. This creates a focal point.
- Finish with a top coat. A matte or satin top coat will emphasize the “muted, luxe” vibe, but a glossy top coat can also work if you prefer shine.
This Damask nails design feels like wrapping your fingers in a piece of vintage brocade. It’s a bold look, but elegant: imagine walking into a room with statement nails as an accessory to a classic red dress. And remember, “Damask patterns offer really complex designs, often with elaborate symmetric medallions”, so don’t worry about perfection – a slightly imperfect hand-painted motif still reads as damask-inspired. The combination of deep burgundy and jet black makes this mani dramatic, but in a timeless, gothic-chic way (both colors are “immensely powerful” on their own). Wear it with confidence!
Floral Power Pop – Colorful Retro Florals
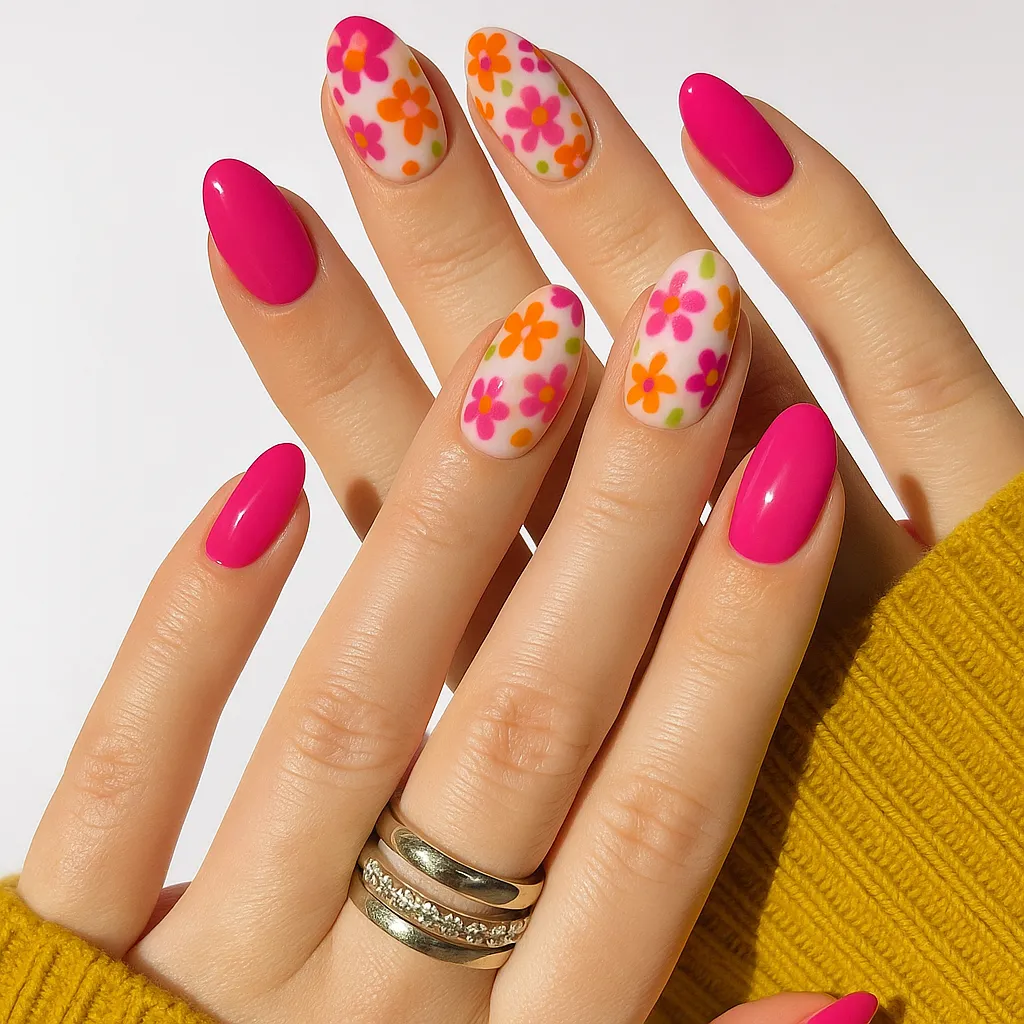
Flower power meets nail power in Floral Power Pop! Channel the swinging ’60s and ’70s with bright, bold blooms on your tips. Retro florals often looked like cheerful wallpaper prints: think daisies, poppies, or abstract florals in rainbow hues. In fact, modern nail artists note that 70s-style flower designs “pop against a black nail base,” and suggest doing them freehand with a fine brush and bright colours. We’ll adapt that for any base you like. Get ready to play with pinks, oranges, greens, and more.
How to achieve this look:
- Start with a solid color base. For a high-contrast effect, use black or navy base on a couple of accent nails, and a bright pastel on others. (You could also do all nails black for maximum drama, or pick a single fun color as your backdrop.) Let it dry.
- Paint the flowers. On each nail, use a dotting tool or small brush to draw simple flower shapes: five-petal daisies or multi-dot flowers. For example, dot five little circles in a ring, then dot another color in the center for the flower’s heart. 70s flowers were often rounded and cartoonish. Use contrasting bright tones – white petals with yellow centers, or neon pink petals with lime centers. If you used black base, the colours will really pop. On a lighter base, try retro-inspired color combos like orange and teal, or pink and green.
- Add leafy touches. Give it that wallpaper feel by adding tiny green leaves or stems with a thin brush. Even just one or two leaves per nail brings the floral motif home.
- Embellish (optional). If you’re feeling extra, you can top the flower centers with a small rhinestone or a dot of glitter. This mimics 70s rhinestone centers and adds dimension (think “embellished daisies” as one blog suggests).
- Seal it in. One coat of glossy topcoat will protect the design and make colors vibrant.
This mani is fun and a little retro-camp. It’s meant to be a power pop of color, so don’t be shy with the brightness. Remember – 70s florals weren’t meant to be tiny or realistic, but bold and fun. Even if your painting isn’t perfect, the charm is in the imperfection and colorfulness. Wear Floral Power Pop to a garden party, a festival, or any day you want to feel youthful and energetic. It’s guaranteed to turn heads!
Funky Floral Stripes – Navy Stripes with Roses
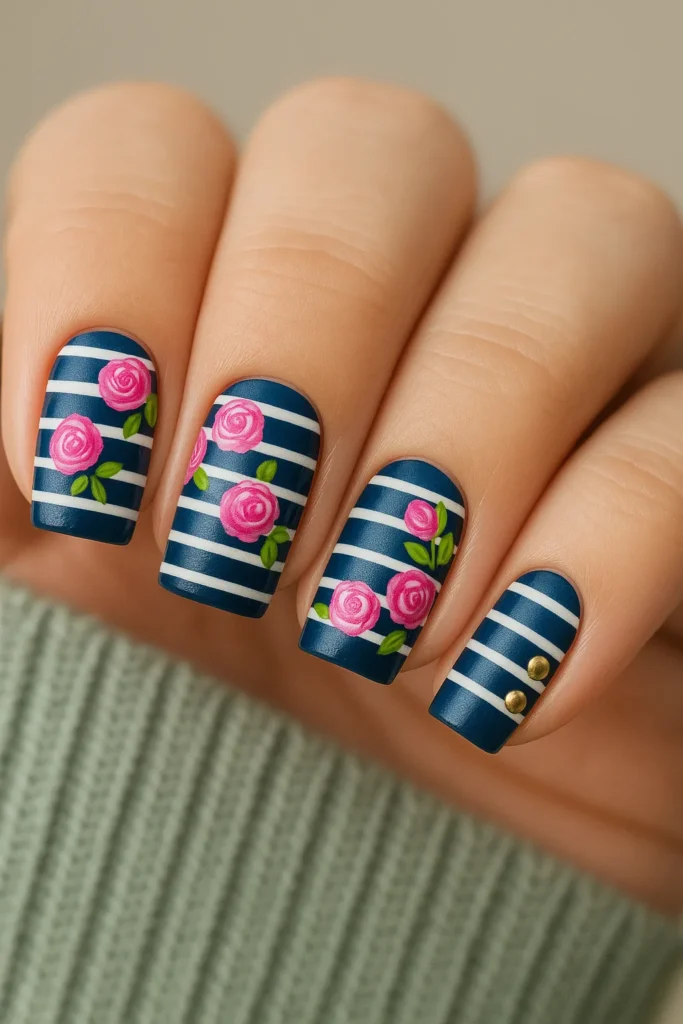
Mixing stripes and florals gives this mani a funky retro-meets-preppy twist. For Funky Floral Stripes, start with a classic navy-and-white striped background and overlay it with pretty hand-painted roses. The combo is like a vibrant vintage wallpaper (imagine a navy wall with rose garlands) brought onto your fingertips.
How to achieve this look:
- Paint the stripes. Lay down two coats of crisp white polish on each nail. Once dry, use thin striping tape or a striping brush to paint even horizontal or vertical stripes in navy blue. Make them about 1-2mm thick and evenly spaced. Allow the stripes to dry before removing any tape (if used).
- Choose floral accent nails. You can paint flowers on all the stripes, but it looks chic to pick one or two accent nails (like ring fingers) for the full floral design. Cover the other nails with your navy-and-white stripes only.
- Paint the roses. On the accent nails, use a very small brush to paint small rosebuds in a deep red or pink. Start by dotting a small cluster of red dots (these are the petals). Then, add tiny green leaves around or near the flower using a green polish (a stylized leaf shape is fine – even a few curved dashes). Retro rose designs often had a slightly geometric, simplified look rather than hyper-realistic petals. If you’re not confident freehanding, you could also use a nail decal or stamp with a rose design for precision.
- Detailing. Add a tiny yellow or white dot in the center of each rose for a highlight or just to define it further.
- Finish. Topcoat with clear polish to smooth everything out. A glossy finish will make the stripes pop, but a matte topcoat could give a nice “vintage wallpaper” texture.
This look is bold yet balanced. Stripes keep it graphic, while the roses soften it with femininity. If you’re inspired by nautical or Southern styles, navy-and-white stripes feel very classic (and navy ties into the 70s-era earth-tone palette from [32†L129-L131]). The roses give it that Funky Floral vibe without going overboard on flower power.
Groovy Gradient Wallpaper – Ombre Rainbow with Glitter
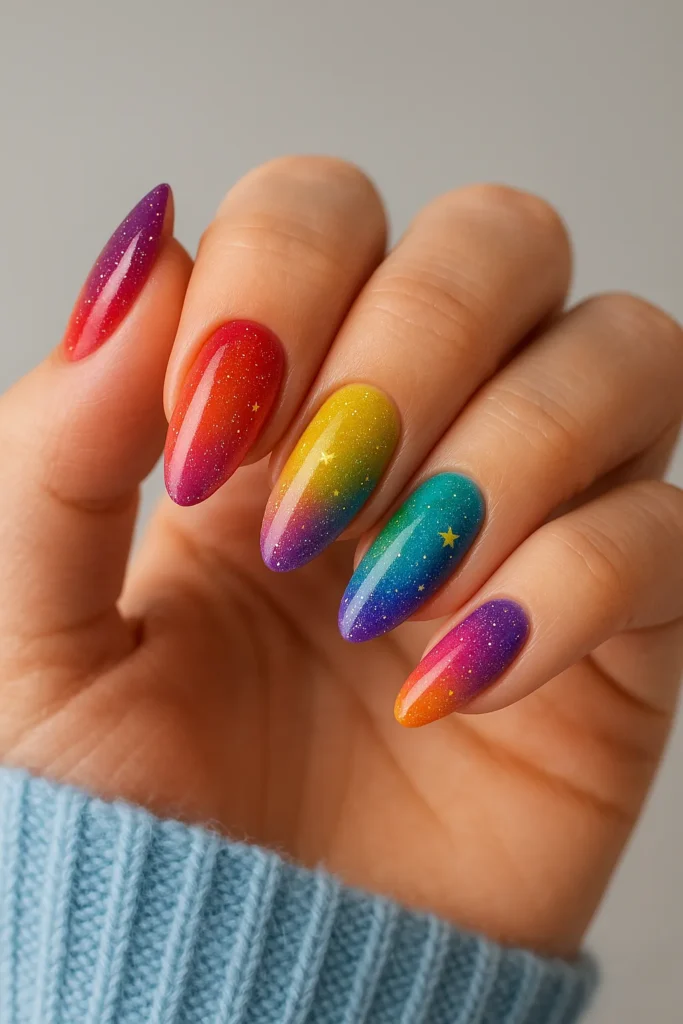
Bring the vibe of swirling rainbow wallpaper into your mani with a Groovy Gradient design. We’re going full-on ombré rainbow, topped with some sparkly glitter to make it feel magical. Ombre nails (smooth color transitions) are stylish and versatile – imagine each nail fading through two or three bright colors, like a scoop of rainbow sherbet. The finish is dreamy and fun; add glitter to mimic the glint of disco and all things sparkly (2024 is all about “things sparkly” on nails).
How to achieve this look:
- Prep nails with base coat. Start with a neutral base color (white or pale) to help the ombré show true color.
- Choose 3–4 colors. Think tropical rainbow: bright pink, sunny yellow, tangerine orange, lime green, turquoise, etc. Arrange them in order you want (for example, pink→orange→yellow→green or pink→yellow→turquoise).
- Sponge on the gradient. Use a makeup sponge or a special nail sponge. Paint stripes of each color next to each other on the sponge in the order you chose, slightly overlapping edges of the colors so they blend. Then gently dab the sponge onto the nail, rolling it from cuticle to tip. The colors should bleed into each other, creating a gradient. You may need to layer the dabbing 2–3 times (letting it dry in between) to get opacity.
- Clean up. Use a small brush dipped in nail polish remover to tidy any polish that got on the skin around your nails.
- Add glitter. Once your rainbow ombré is dry, brush on a thin layer of fine holographic glitter polish or clear polish loaded with multi-colored sparkle. Concentrate more glitter near the cuticle and fade it out toward the tip, or apply evenly across the whole nail for extra dazzle. As one beauty expert notes, “2024 is calling for all things sparkly… perfect sparkly nail designs are sure to be trending” – so go ahead and embrace the glitz!
- Top coat. Seal with a shiny top coat to smooth the sponge texture and lock in the glitter.
The result: nails that look like a dreamy watercolor rainbow wallpaper. Every nail is a little different (you’re not going for perfection here), which makes the overall look even more fun. You could stick to the same color order on each nail, or mix it up: no matter what, the pastel rainbow effect “screams spring, but it also works for any season”. Finish with lots of positive vibes – your tips will be groovy and eye-catching.
Mod Geometry – Angular Color Blocks in Earth Tones
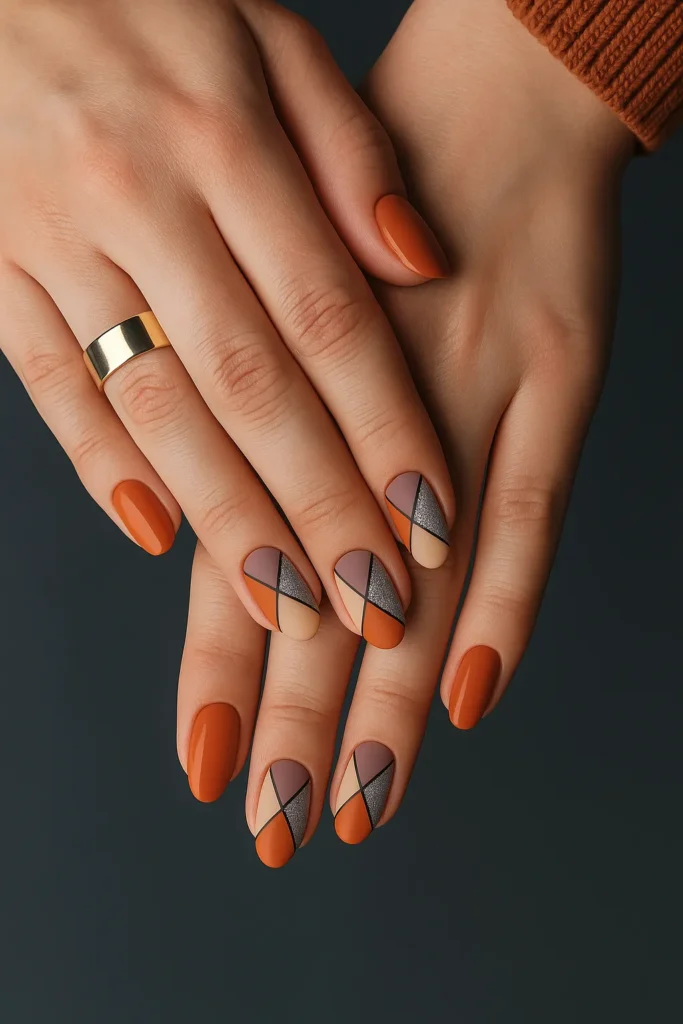
The Mod Geometry mani is a tribute to 1960s mod art. Imagine your nails as miniature canvases for bold, angular color blocks, like a Mondrian painting or the sharp lines of a retro dress. We’ll use an earthy palette – think brown, olive, mustard and cream – to give it that 70s twist. The 60s were known for “vibrant colors… in geometric shapes, creating a striking visual effect”. We’ll tone it down slightly with mud-tone warmth, so it reads both mod and sophisticated.
How to achieve this look:
- Paint a base color. A neutral cream or pale beige works great. This will make other blocks pop. Let it dry fully.
- Section your nail. Using thin striping tape or nail vinyl guides, mask off angular sections on each nail. You might create triangles, trapezoids, or even a diagonal stripe. Arrange the tape at various angles (vertical, diagonal, or horizontal) to divide the nail into 3–4 distinct areas. Press the tape down firmly to prevent polish bleed.
- Fill with color blocks. Paint each section with a different “earthy” hue: for example, olive green in one section, mustard yellow in another, and a rich chocolate brown in a third. You could also add a burnt orange. If you accidentally go outside the lines, don’t fret – we’ll clean up edges. Remove each tape after painting and before the polish fully dries so the color doesn’t smudge.
- Clean up edges. Use a small brush dipped in remover to sharpen the dividing lines. The more crisp the angles, the more graphic the result.
- Repeat on all nails. Keep the pattern asymmetrical between nails for interest (each nail doesn’t have to match). For instance, if your index finger has a large diagonal block of olive, maybe your middle finger has a horizontal block of brown. Variety is key.
- Top coat. Add a glossy top coat to enhance the colors. The gloss will make the earth tones look richer.
This Mod Geometry style is fun and mature at the same time. It echoes the “bold mod designs” of the ’60s, while the 70s-inspired palette keeps it grounded. Wear it with corduroys or denim for a true retro vibe. Each nail looks like a tiny piece of abstract art – as long as your lines are sharp, you’ll capture that vintage mod energy perfectly.
Muted Plaid Revival – Matte Plaid in Red, Navy, and Cream
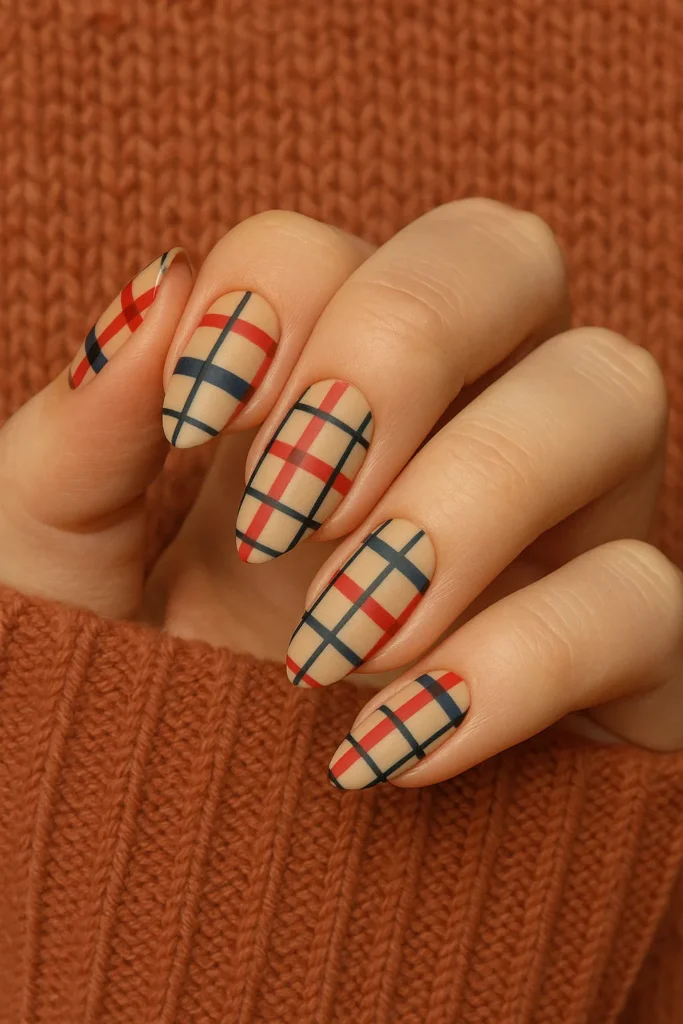
Plaid isn’t just for flannel shirts – it’s a cozy retro pattern for nails too. The Muted Plaid Revival mani brings to mind classic tartan or plaid wallpaper in warm, autumnal tones. Think red, navy, and cream lines arranged in a simple criss-cross, with a matte finish for a modern twist. This look is a nod to preppy and vintage styles, done in a more subdued, “matte” way.
How to achieve this look:
- Pick a base color. Paint your nails a matte cream or off-white. If you only have glossy polish, you can achieve a matte effect by applying a matte top coat later.
- Create the first set of lines. With a thin brush or striping tool, draw evenly spaced vertical stripes in navy blue. Make them 1-2mm wide, leaving about 1-2mm gap between each. Let this layer dry.
- Cross with horizontal lines. Now add horizontal lines in a burgundy or deep red polish, intersecting the blue stripes. Again, space them evenly (they should be at right angles to the blue stripes, just like plaid). At the intersections, the colors will overlap (for an authentic plaid look, you could let the polish mix to form a purple-ish crossing color, or go over the blue with red for an opaque finish).
- Refine the edges. Use a fine brush with remover to clean up any messy edges. Plaid should have crisp lines.
- Optional accent. On an accent nail (e.g. the ring finger), instead of stripes, draw a single cream or red tartan motif (like a box with double border lines) to vary the pattern.
- Top coat – go matte. Finish with a matte top coat (or matte clear polish). The matte look makes the plaid feel more contemporary and “textile-like,” rather than shiny and sticker-ish.
Plaid in these rich colors feels like a vintage sweater or wallpaper (plaid has deep roots, even in Scottish history!), but the matte treatment keeps it modern. You’ll end up with nails that look elegantly subdued yet patterned. This design pairs perfectly with cozy fall outfits or even your best steampunk or granny-chic ensemble. Remember, the charm is in the pattern more than perfection, so embrace any little imperfections in your lines as part of the “woven” effect.
Tropical Tiki Vibes – Coral/Teal Nails with Leaves and Flamingos
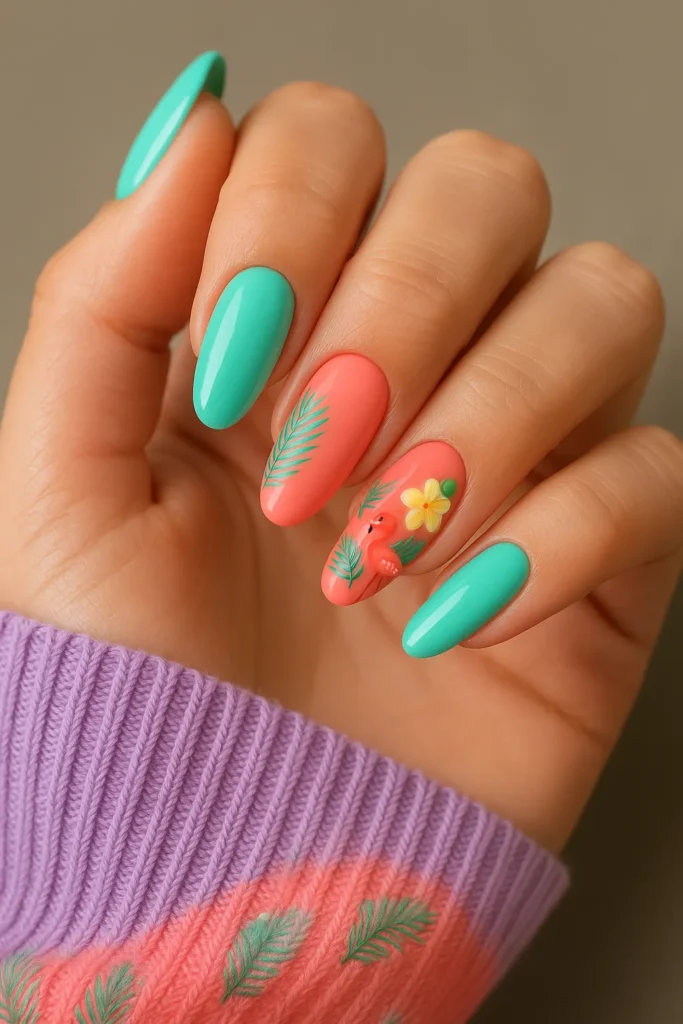
Our final Fun Nail Idea brings a warm, tropical twist. Tropical Tiki Vibes features bright coral and teal nails adorned with leafy palm motifs and whimsical flamingos – think Hawaiiana wallpaper meets summer party. Tropical nail art is all about colorful, bright elements like leaves, flowers, and beach critters. It “conveys the joy and warmth of tropical areas” on your fingertips, perfect for vacation mode or just a fun-day pick-me-up. Popular tropical nail hues are teal, orange, and yellow (coral counts as a spirited cousin of orange), so our coral + teal combo is right on trend.
How to achieve this look:
- Paint base colors. On alternating nails, paint two coats of coral (a warm pinkish-orange) and on the others use teal. This color-block effect is playful.
- Stamp or draw leaves. Using a thin brush and a darker green polish, paint simple palm leaves or monstera leaf shapes on the teal nails (teal acts as an ocean-like background). A few curved fronds on one side of the nail is enough. If you have a leaf stamping plate, you could stamp green leaves for precision.
- Add flamingos. On the coral nails, use a thin black or dark pink brush to outline tiny flamingo silhouettes – essentially an S-shaped neck and body (you can simplify it to a curved line for the neck and a dot or oval for the body). If freehanding flamingos is tricky, consider a nail vinyl or decal of a flamingo. Even one small flamingo per nail will give the tiki feel.
- Detailing. For extra fun, add a tiny dot of black or a rhinestone for the flamingo’s eye, and maybe a yellow beak. Sprinkle a few white or gold dots around the leaves/flamingo for a festive confetti look.
- Seal with gloss. A clear top coat will make the colors pop and give the nails a summery sheen.
This mani is bright, playful, and made for summer vacations – but don’t worry if you’re not traveling to Bali. You can recreate the island feeling anytime. The contrast of coral and teal is eye-catching, and the tropical motifs scream fun. Remember the basics: “Colorful, bright colors and tropical-themed elements like flowers, leaves… characterize tropical nails”, so lean into the pinks, greens, and island icons. Stand tall (on one leg, like a flamingo) and enjoy your mini tropical getaway on your fingertips!
Conclusion
Retro never felt so fresh! With these 9 Fun Nail Ideas, you’ve brought iconic wallpaper-inspired patterns to life. Each design is a little piece of fashion history on your fingertips – from the groovy 70s swirls to elegant damask and even a splash of tiki paradise. And the best part? You made them yourself. Nail art is about creativity and self-expression, so no matter how perfect your technique is, your nails will radiate personal style and confidence.
Now it’s your turn: pick a design (or mix and match!), gather your favorite polishes and tools, and get painting. These looks are all about fun and attitude, so don’t be afraid to experiment. As Caroline Hirons would encourage: you’ve got this – nail art is for everyone. Treat your manicure like an adventure into fashion. Soon you’ll be rocking ’70s vibes, starry nights, baroque elegance, or tropical flair at the snap of a top coat. Enjoy the process, celebrate your creativity, and show off those nails!